Sunday, February 25, 2018

Mediterranean-style Layered Chicken in the Dutch Oven

This dish was inspired by a lot of Italian and Mediterranean flavors. The layering of the the ingredients helps to keep the flavors a bit more distinct, whereas they would be more blended if they cooked as a stew or casserole. It’s an easy to make one-pot meal, with meat, veggies, and dairy all mixed in. If you serve it with some bread sticks, you have your grain/starch right there. It was way yummy!

When I did this for my family, I sauteed some yellow and zucchini squash slices in another dutch oven as a tasty side dish.

Mediterranean-style Layered Chicken

12” Shallow Dutch oven
10 coals below
16-18 coals above

10” shallow Dutch oven
10-12 coals below

  • 2 lbs boneless, skinless chicken breast
  • Salt
  • Pepper
  • Paprika

  • 3x 14 oz cans diced tomatoes
  • Oregano
  • Parsley
  • basil
  • Salt
  • Pepper
  • Garlic powder
  • Cayenne (just a little)
  • Lemon juice


  • 1 lb ricotta
  • 1/2 cup parmesan
  • 2 medium Onions


  • 2x 14 oz cans Artichoke hearts
  • 2x 14 oz cans olives
  • Fresh Parsley
  • Green onions
  • 16 oz grated mozzarella


While the coals were getting hot, I started by prepping the food for the layers.  I began by blotting the thawed chicken breasts dry, then cutting them into 1” cubes. I seasoned the cubes with the salt, pepper and paprika, which is my go-to meat seasoning.

Then, I made the tomato mix by opening up the cans of diced tomatoes and adding in all of the seasonings in the second set of ingredients. I was pretty liberal with the flavorings, except for the cayenne, and I tasted all along the way, just to make sure that the balance of seasonings was good. Next, I mixed the ricotta and the parmesan cheeses. I actually added some feta in, too, because we had some. After that, I sliced the onions (in circles).

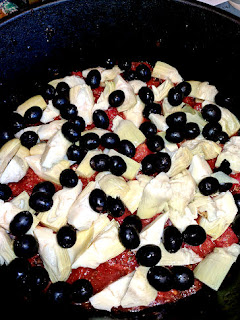
The last prep step was to assemble the layers in the Dutch oven. I started by spreading about a third of the tomato mix over the bottom of the Dutch oven. Then, I added these layers, in order, assembling upward:


  • Artichoke hearts (drained)
  • Olives (drained)
  • Chicken cubes
  • Cheese mix
  • Onion slices
  • The rest of the tomato mix
  • Minced fresh parsley/green onions
  • And finally, a layer of shredded mozarella


Here are some pics:


Once it was all assembled, it was just a matter of putting it on the coals and baking it for about 45 minutes. I kept some fresh coals going in the chimney and replenished the coals on the oven about every 15-20 minutes.

While it was baking (in fact, when it was almost done), I put the 10” Dutch oven on the coals, with a little olive oil in it. I sliced a couple of zucchini and yellow squashes each, and tossed them into the heated oil to sautee with a little salt and pepper. I only cooked them for about 10 minutes or so, just long enough to get hot and a little soft, but still be crispy.

Then, it was ready to serve!


Mark has discovered a love of Dutch Oven Cooking. Mark also has other sites and blogs, including MarkHansenMusic.com and his MoBoy blog.

Sunday, January 21, 2018

Dutch Oven Pork Chops and Rice

This one was really, really easy. A half hour of prep time, not including thawing, and an hour or so of cook time, tops. It’s one of those one-pot meals, and it’s also a one-step meal.

12” shallow Dutch oven

10-12 coals below
16-18 coals above

4-6 large pork chops
Salt
Pepper
Paprika
Garlic powder
Worcestershire Sauce

3 cups rice
4 cups stock
1 can cream of mushroom soup
1 cup sour cream
2 onions
1 green pepper
Salt
Pepper
Oregano
Basil
Parsley

The first thing I did was to thaw the pork chops. Once that was done, I set them out on the countertop, patted them dry, and seasoned them with all of the flavorings in the ingredient set. I let those seasonings sit for a few minutes while I went out and lit up the coals.

While the coals were heating, I prepared the Dutch oven. I put the rice in, with the stock, the soup, and the sour cream. I stirred that up to break up the gelatinous soup concentrate.

Then, I sliced the onions and the green peppers. I didn’t dice them, but it really doesn’t make any difference. You could also include any other veggies you like. Celery and/or carrot chips would have been a tasty addition. I scattered these over the top of the rice and liquid. Onto that, I sprinkled the seasonings and herbs. I’m pretty generous with the herbs, too.

Finally, I layered the pork chops on top of the rice mix. I had six chops, and they were pretty thick and large, so I made two layers.

I put the lid on and took it out to my cookspot. I put it on and under the coals listed above, and cooked it for about an hour to an hour and ten minutes. I had to keep adding coals (maybe a half dozen at a time) to the chimney so that I could add fresh coals to the top and bottom every 15-20 minutes. I put more on the top than the bottom. You really can’t go wrong with this dish because of all the liquid, but I didn’t want to risk burning the bottom of the rice.

Then, I brought it in and served it up. A pork chop with rice on the side for each plate!


Mark has discovered a love of Dutch Oven Cooking. Mark also has other sites and blogs, including MarkHansenMusic.com and his MoBoy blog.
Tuesday, January 9, 2018

Dutch Oven Sweet & Savory Chicken


This week’s entry was born of convenience. I decided to cook outdoors, since the temperature was to be a balmy 40+ degrees F (that’s about 10 higher than “normal” here in northern utah for this time of year). So, I looked around to see what I could make. Chicken we had in abundance, but what, oh, what to do with it?

I thought of a few ideas, but nothing was really tempting me. I looked in the pantry and got a few thoughts going, and finally settled on a can of pineapple and a can of beans.

Hmmmm... Sweet, savory... It was starting to come together.

A few trips to google for some more ideas, and then we had a final result!

Dutch Oven Sweet & Savory Chicken over Rice

12” Shallow Dutch Oven
20+ coals underneath for sauteing, browning
16-18 coals above, 8-12 coals below for the final cook

8” Dutch Oven
8-10 coals below

Marinade:
1-2 tsp Salt
1 tsp Black pepper
1 tsp Paprika
1/4 cup honey
1/2 cup soy sauce
Zest and juice of 3 limes

2 lbs boneless skinless chicken breast, thawed and cubed

Vegetable oil
1-2 medium Onions, diced
4-5 cloves Garlic, minced
salt

2 15oz cans black beans
1-2 20 oz cans Pineapple tidbits
Liberal shakes of:
  Dill weed
  Paprika
  Oregano
  Parsley
Not quite as liberal shakes of:
  Cayenne pepper

3 cups chicken broth (or water, if you don't have broth)
1.5 cups rice

I started by mixing the ingredients of the marinade in a bowl. These measurements are approximate. Then, I cubed the chicken to about 1” cubes, and added the chunks to the bowl, stirring it up. Once the chicken is added, you could put in more honey, soy sauce, and juice to coat the chicken. I set all that aside for an hour or so in the fridge. You could soak it longer, even overnight.

Then, when I was ready to start cooking, I lit up a bunch of coals, and while that was heating up, I diced the onions and minced the garlic. I put my 12” dutch oven on the coals, as listed above, with a little oil, and let that heat up. Since I was going to saute, and then brown the meat, I wanted it to be pretty hot, at least at the start. Once the oil was a bit shimmery, I tossed in the onions and the garlic (if it sizzles a lot when you do this, you were hot enough. If it doesn’t sizzle, wait longer next time.). Then, I sprinkled on a bit of salt and tossed the onions. The salt helps draw out the moisture in addition to upping the flavor ante.

Then, after a few minutes, I tossed in the garlic. Garlic will brown quicker than onions, and can actually burn before the onions are done if you put them in at the same time.

Once the onions were nice and translucent, I put in just a bit more oil, stirred that up and tossed in the chicken. I stirred it frequently, getting it mostly cooked. It doesn’t have to be FULLY cooked through, though, because you’ll be baking it in the final step.

Once the chicken was cooked on the outside, I added the beans and the pineapple (you can adjust the amounts based on how big your Dutch oven is, how much chicken you used, and how many you’re feeding.  Then, I added in all of the flavorings, put on the lid, and adjusted the coals for the final cooking stage, some on top and some on the bottom. From then on, I only had to stir it occasionally, and check the taste for the adjustment of the seasonings.

While that was cooking, I put the broth and the rice in the 8” Dutch Oven, and set it on its own coals. In this blog entry, I talk about how to cook rice accurately every time!  The other chicken recipe is also great and something you might want to do sometime!
Once it was all cooked, it felt a bit too liquid-y to me, so I took the lid off and piled fresh coals underneath and simmered it for a bit to reduce the liquid. You could also sprinkle in some cornstarch and stir, too.

Finally, I served it up on the plate of rice with a bit of salad on the side! It was amazing!


Mark has discovered a love of Dutch Oven Cooking. Mark also has other sites and blogs, including MarkHansenMusic.com and his MoBoy blog.

LinkWithin

Related Posts with Thumbnails