Sunday, March 27, 2011

Dutch Oven Irish Soda Bread

For several years, now, I’ve been working on breads.  I’ve done sourdoughs, whites, ryes, sweets, whole wheats, all kindsa breads.

But, the one kinda bread that has forever eluded my success is the Irish Soda Bread.  I’ve tried it many times and always failed.  Most of the time it would turn out like a brick.  Sometimes the inner crumb would be fairly soft, but even that was usually pretty dense, and the crust would be like a suit of armor.

I studied and researched and tried very hard to figure out why it wasn’t working.  I saw many recipes, and many of the ones that looked light and fluffy read more like cake recipes than bread, with lots of sugar and eggs.  It just didn’t seem like the Irish soda bread I was shooting for.  Crusty is fine, as long as it’s still soft to the teeth.  I wanted it to puff up and brown in the oven.  I also was shooting for a crumb that had air bubbles in it, not huge ones, but enough to make it easy to eat.

I remember that I came across one site where someone clearly had an axe to grind, as he was trying to preserve the concept of a “traditional irish soda bread”.

The problem is that, even with all this study and learning, my soda loaves still would turn out as if they could easily be used to grind axes.  Practical, but that didn’t make them any more palatable, even with butter and jam.

I did learn, however, that dutch ovens (or something like them) were often used to bake traditional soda bread.  They were big cast iron pots, and they often had sharp bumps on the underside of the lid.  When cooking, especially meats, these would be points where the steam would gather and drip back down onto the meat.  This earned them the name “bastibles”.

I just didn’t feel like I could claim any authority as a dutch oven bread baker if I couldn’t do a decent chemically leavened bread.  I knew that it COULD be done in a dutch oven, but I just couldn’t seem to be able to pull it off.

...Until today, that is!

Dutch Oven Traditional Irish Soda Bread

12” Dutch oven

10-12 coals below
20-24 coals above


  • 2  Full Cups of All Purpose Flour 
  • 1 tsp. Salt
  • 1  Slightly Heaped tsp. Cream of Tartar
  • 1 Heaped tsp. Baking Soda
  • 1 Cup (Full 1/2 Pint carton) of Buttermilk


I started by lighting the coals.  Once those were showing some good white burn, I set the dutch oven (with a spritz of oil on the inside), on and under the coals.  While that was pre-heating, I set about making the dough.  It goes really very quickly.

I added all of the dry ingredients together in a bowl.  I sifted in the flour, mainly to aerate it.  Notice, also, that I didn’t use bread flour.  In my studies, I’ve learned that chemical leavens don’t rely on gluten strands to trap the gas, and rise, like yeast breads do.  Instead the chemicals interact, create the gas, which is trapped by the liquid and the fats in the buttermilk.  It’s also the acids in the buttermilk that react with the soda that produce the gas in the first place.

Back to the process...

Then, I made a well in the middle, poured in the buttermilk, and gradually stirred it in.  Soon, it was clumping together.  I reached in with my fingers and kneaded it in the bowl, and shaped it.  This is a very important part:  Don’t work it too much.  It’s NOT a yeast bread where you’re kneading it for 20 minutes or more.  A few squeezes and folds to mix it well and a bit of shaping and molding and you’re ready to go.

I shaped it into a disc about six inches by about an inch and a half high.  This is another important part.  I don’t know how I missed this, but in the past, I always shaped it into a ball.  I think that had a big, big impact on how much it rose up and how the heat could cook into the bread.

I cut a cross pattern on the top of the bread.  There are all kinds of stories about why this bread is traditionally cut with a cross on top.  I’m a kind of practical guy, so I know why I did it.  One:  it allows the bread to spring up and spread.  Two, it gives it a place to vent a lot of the steam as it bakes.  And, three, it makes it very easy to break into four even pieces once it’s done.

Finally, I took it out and put it into the dutch oven.  It looked kinda small and pathetic when I put it in, actually.  It made me think that next time, I’d probably double the recipe, or cook it in the 10” instead.

I ended up cooking it about 40 minutes, I think.  I would recommend it be cooked to an internal temperature of 160-180.  I did this one to 190, and it was a little too crusty, I think, especially on the bottom.  Resist the urge to add too many coals underneath, by the way.  Watch the bottom coals, and do some replenishing so they don’t burn out, but don’t go crazy with it.

Because I was so uncertain about how to do it this time, I also checked it a bit too often, I think.  Every time you pull the lid, more trapped heat escapes.  In the future, I won’t feel like I have to check it as often.

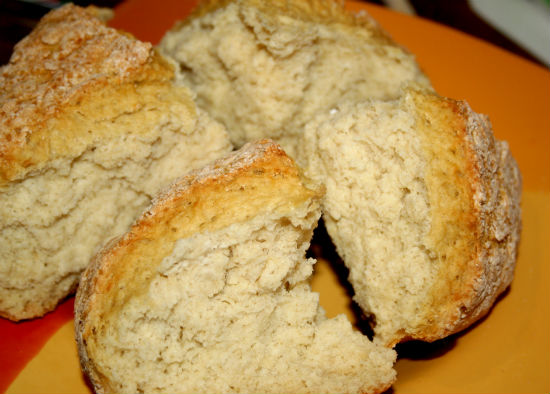
In the end, it swelled up fine, and it tasted great.  It smelled wonderful as well.

I’ve learned that traditional Irish soda bread is a totally different animal from yeast breads.  In order for me to successfully make this loaf I had to separate myself from much of what I had learned about yeast bread making.


share


Mark has discovered a love of Dutch Oven Cooking. Mark also has other sites and blogs, including MarkHansenMusic.com and his MoBoy blog.

Monday, March 14, 2011

Dutch Oven Baklava

This recipe and story is included in my Dutch oven cookbook, "Around the World in a Dutch Oven"

I love baklava.

Let me say that again, and make it more clear:

I LOVE BAKLAVA.

Truly it is the dessert of the gods.

And making it was a lot of fun.  It’s simple, yet complex.  It’s peasant, yet elegant.  Few ingredients combine for amazing flavor.  It’s labor-intensive, but every delicate bite is worth the effort.  It’s... yeah...  You get the point.  Plus, I think that baklava’s calories don’t count, right?

Michelle, my wife’s cousin, told me that when I had asked her to help me make baklava, she had been surprised and wondered if that could be done in a dutch oven.  I love to try and cook things in dutch ovens that aren’t supposed to be cooked in dutch ovens!  I’m kinda twisted that way.

This one will be a little bit difficult to write up, because Michelle is much more of a free spirit in th kitchen.  Be warned that many of the amounts that I’ve listed here are approximations and guesses.  I remember the ingredients we used, but the measurements aren’t so critical.  Also, I think that much of the success of baklava is in the process, not so much the exact amounts.

Dutch Oven Baklava

12” shallow dutch oven

12-14 coals below
24-28 coals above


  • 2 Cups Walnuts, chopped
  • ¼ cup brown sugar
  • Liberal shakes of cinnamon

  • Fillo Dough
  • Two sticks of butter, melted

  • About ½ cup Honey
  • About ¼ cup Sugar
  • Water to make a medium-thick syrup.


We started by mixing the first set of ingredients.  It’s pretty straight-forward.  Chop up the nuts, mix in the sugar and the cinnamon.  It does work better if the brown sugar is fresh, otherwise, you’ll have hard chunks to break up.  Not fun.

Then it came time to make the layers.  We simply melted the butter in the microwave.  It would be easy enough to simply put the 8” dutch oven on a few coals and melt it that way.  In fact, you could keep a few coals on it during the layering process and it would keep it from cooling and solidifying.  You don’t want to boil it.

Then, we unrolled the Fillo dough (store-bought) from the package.  It was a wide rectangular stack, which we cut in half (to a little bigger than an 8.5x11 sheet of paper).  The two halves were stacked on top of each other, then put on top of and underneath sheets of wax paper.  That was all topped with a slightly damp towel, to keep the Fillo dough moist.

With a pastry brush, we spread a little butter in the bottom of the dutch oven, then spread one of the sheets of Fillo dough.  With the brush, we brushed butter in the corners of the “paper” and gently over the dough’s surface. The next one we put in the same way, but at a 90-degree angle.  We brushed butter onto that one as well.  We went on stacking, layering Fillo, butter, Fillo, butter, each sheet at a ninety degree angle, crossways from the one below it.   I wondered if it would work to do it at a 60-degree angle, and go around the circle in sixths instead.  I doubt it would have made much difference.

After about a third of the total layers of fillo dough, we spread an even layer (not too thick) of the nut and sugar mixture, enough to cover the dough.  You shouldn’t be able to see through the nuts to the dough, but no deeper than that. If you don’t already have coals burning, you should go out and light them at this point. We already had coals lit and cooking the dolmades.

Then, we got back to the layering, for another third of the dough.   We followed that with another spread of nuts and sugar. At this point, your coals should be nice and hot.  We put a whole bunch on the dutch oven lid, and let it pre-heat.  Finally, we layered the rest of the dough.

The next step was to get a knife and cut the slices.  This is where you can make the characteristic diamond patter.  I don’t know if this is anything other than tradition.  It could be rooted in some esoteric cooking reasoning.  I don’t know why it’s done.  You do need to cut it, and it needs to be cut at this stage because it will be to crisp and crackly to cut later, and the syrup needs to be able to run down into the baklava.  However, I don’t know why it should be done in diamonds.

While that was cooking, we made the syrup.  Actually, we ate the dolmades and the soup.  But had we been really on top of things, we would have made the syrup while the baklava was cooking.  We did it on the stove top.  If I had been going “purist-style”, we would have made the syrup in my 8” dutch oven.  Simply combine the syrup set ingredients and simmer until it’s the right consistency.  Not as thick as the honey, but not as runny as the water.  Somewhere in between.

We put it on the coals and cooked it for about a half hour to 40 minutes.  When the top layer was a nice golden brown, it was time to take it off.

With the baklava baked and brown, and the syrup ready, simply pour the syrup over the baklava. It will run into the cracks between the baklava pieces that you cut, and soak into the fillo dough layers.  That will give it that sticky, gooey sweetness that you love so much about baklava.

Then, let it cool a little, and serve it up!  Ours didn’t last long, so I have no idea how long it’ll keep!


Cooking in a Dutch oven can be so much fun!  Here are some camping Dutch oven recipes!

share


Mark has discovered a love of Dutch Oven Cooking. Mark also has other sites and blogs, including MarkHansenMusic.com and his MoBoy blog.

Tuesday, March 8, 2011

Dutch Oven Dolmades

When I first heard of dolmades (or “dolmas”, or just “rolled grape leaves”), I was kinda grossed out.  It didn’t sound very good.  But once I had tried them, I was hooked.  I love these things!  And when I started doing dutch ovens, I knew that at some point I was going to try to make them.

My wife’s cousin, Michelle, knows how to cook a lot of Middle-eastern and Mediterranean foods, so I asked her to come over and show me.  So, she did!  There was one major miscommunication, that I somehow missed, and I cooked the rice before hand.  Shouldn’ta done that.  But other than that, it all turned out.

The idea was to kind of do a whole greek/middle eastern meal: Dolmades, a chicken/rice/lemon soup, and baklava.  It didn’t turn out quite as I had anticipated.  I think I shoulda taken it a bit at a time.  The soup was blah, but the dolmades and the baklava turned out great.


As I was preparing to write up the recipe, here, I did a little research, and confirmed some things I already kind knew.  Like, that there are soooo many variations of this dish that you really can’t do it wrong.  Even from family to family, the flavor and the recipes change so much.  It all remains similar, but don’t be afraid to make it your own.

Dolmades in a Dutch Oven

12” dutch oven
20+ coals below for the meat filling
12-15 coals above and below for the final cooking.

    * olive oil
    * 1 medium to large onion, diced
    * 3-4 cloves garlic, minced
    * 1-1 ½  lbs of ground meat (pretty much any kind except pork, and not a sausage)
    * 1-2 Tbsp Baharat
    * Other spices or flavorings, as you choose, like:
          o cinnamon
          o Allspice
          o minced fresh parsley
          o minced fresh mint leaves
          o pine nuts
          o lemon zest
          o salt
          o pepper
    * 1 ½ cups uncooked rice
    * extra water, as needed


    * Grape leaves, blanched


    * 2-3 tomatoes, chopped
    * 3 cups chicken stock or water
    * More alternate flavorings:
          o Lemon juice and lemon wedges
          o 2-3 cloves garlic, sliced


This adventure started by putting about 20 coals under a dutch oven with a little oil in the bottom.  I diced up an onion and minced the garlic cloves and, when the oil was hot enough, tossed them in to saute.  If they sizzle and jump right away, you know it was hot enough.  I ground on a little salt, too.

Once the onions were browned a little, I added in the meat.  This time, I used ground turkey.  If I can acquire it next time, I’ll use lamb, but ordinary ground beef is ok, too. As that was browning, I added in the baharat.  Baharat is a mix of spices commonly used in middle eastern cooking.  You can buy it at a specialty market, or using the wikipedia as a guide, mix your own.  Really, the seasonings and the flavorings are completely up to you.  Again, there are so many regional and familial variations on this dish that you really can’t go wrong.

Once this is cooked, I pulled it off the heat and let it cool some.  Then, I added in the rice.  Don’t cook the rice.  That was a mistake I made.  With all this, the filling is ready.


I rinsed out the dutch oven, and wiped it down. I spread a little olive oil in the bottom, and we got ready to roll the dolmas.  One suggestion that Michelle made was to spread a layer of chopped tomatoes over the bottom of the pan, to raise up the dolmas and make them not burn or stick to the pan.  That sounded like a great idea, but we didn’t have any tomatoes.  You try it and tell me how it works.  Instead, we covered the bottom of the pan with one layer of flat grape leaves.

So, here’s how to roll the dolmas:

   1. Separate out a grape leaf, and pinch off any of the stem that’s left.
   2. Lay it flat, with the vein side up, and unfold it, if there are any folds.
   3. Spread a finger-width spot of filling (about 2 finger joints long) on the leaf.  Put it just above where the stem was. (see the picture).
   4. Fold the lower part of the leaf up and over the filling.
   5. Fold the sides over the filling
   6. Roll it the rest of the way up
   7. Place it on the leaves or the tomatoes in the bottom of the dutch oven, making a single layer of dolmas.
   8. Keep going.  You can add on a second layer if you have enough leaves and filling.


After we’d rolled up all of our filling, I added some of the garlic slices and lemon slices on top.  Then we poured on the stock.  The dolmas tended to float a little, and Michelle said you can put a plate on them to weigh them down.

This went on the coals.  As I did some research afterward, some people cook them in a skillet, uncovered.  I used the coals listed above, with the dutch oven lid on, half above, half below.  You don’t need to cook it long, just to cook the rice and the leaves.  Maybe about 10-15 minutes, once it’s boiling.  I would watch for venting steam out of the lid of the dutch oven, and pull them off about 10 minutes or so later.

Now, at this point, we were pretty busy making the soup and the baklava, so I didn’t make any of the cucumber yogurt sauce (tzatziki) that I love so much with dolmades.  But I added a link to the recipe.

So, on to the Baklava!


share

Mark has discovered a love of Dutch Oven Cooking. Mark also has other sites and blogs, including MarkHansenMusic.com and his MoBoy blog.

LinkWithin

Related Posts with Thumbnails