
Thursday, November 21, 2013
WBEV Radio Interview: Dutch Oven Breads
Back in October, I had a couple of great opportunities to do some phone interviews for radio stations all over the country.
I really love being interviewed. It's so much fun to converse with people about topics I love. It really is a thrill. This interviewer was very good, too, and had done her homework before the interview.
Unfortunately, the first minute or so of the interview wasn't recorded, so it cuts in as we were talking about the nature of bread.
Mark has discovered a love of Dutch Oven Cooking. Mark also has other sites and blogs, including MarkHansenMusic.com and his MoBoy blog.
Wednesday, November 13, 2013
Dutch Oven Venison Meatloaf
With a Tomato-Apple Sauce
 When I was up at the campground, with all of our friends who have children with special health care needs, I got to meet a few new friends. Saturday morning, a few of us Dutch oven guys brought our pots together and we made mountain man breakfast for everyone. Dave coordinated that one.
Another father there, also named Mark, was very enthusiastic about Dutch ovening, and he and I got to talking about game meats. He’s an avid hunter, and I have relatively little experience cooking wild game. I got a lot of good ideas and tips from him, and we had a lot of fun talking together.
So, when I came back, I remembered that I had a few pounds of ground game. It had been given to us by my sister-in-law. It was wrapped, but unlabeled in our freezer. I suspect it was elk, but I’m not certain. I wracked my brain trying to think of something to do with it, and after some research, I settled on a few meatloaf recipes to blend together.
If an animal has been field-dressed well, it will go a long way toward removing the “gaminess” of the flavor. Acids and herbs can do much for that as well. There are plenty of both in this recipe, both in the meat and the sauce.
12” Dutch oven
10-12 coals below
18-24 coals above
8” Dutch oven
10-12 coals below
Ingredients
Meatloaf:
2 pounds ground venison
2 large eggs
2 8 oz cans tomato sauce
1 medium onion, finely chopped
1 1/2 teaspoon sea salt
1/2 teaspoon freshly ground black pepper
2-3 tablespoons mustard
2-3 tablespoons apple cider vinegar
Liberal sprinklings of:
Parsley
sage
thyme
oregano
Not so liberal sprinklings of:
Chili powder
2-3 large potatoes, quartered and sliced
Sauce:
~1/4 cup juices from the meat
3 small apples, peeled and grated
6 ounces tomato paste
1 small onion, diced
2 tablespoons apple cider vinegar
2 teaspoons paprika
2 teaspoons cinnamon
1 teaspoon salt
1/2 teaspoon red pepper flakes
1/4 teaspoon freshly ground black pepper.
After thawing the meat in the fridge overnight, I started, as I usually do, by lighting up some coals and letting them get a bit white.
The meatloaf was actually very easy to make. I simply mixed everything up in a bowl (except the potatoes). Then I spread it around in the Dutch oven. It was originally my intention to make a loaf mound of meat in the middle of the Dutch oven, and then to scatter the potato bits around it to fill it in. However, I think I actually had closer to 3 pounds of meat, so I was able to cover the whole dutch oven with some depth. So, I just tossed the potatoes evenly over the top.
It baked for probably about an hour before the internal temperature read 150. Really, it’s fine if it goes over that.
 About 15 minutes before it was done, I checked it, and there was a lot of liquid. I used a small ladle to spoon most of it off into the 8” Dutch oven, and I put it on some coals. I had already peeled and grated the apples while I was cooking the meatloaf, so I added that into the 8” with all of the other sauce ingredients and put the lid on. I just let it simmer and boil a bit, to blend the flavors and to loosen the apple shreds a bit.
Finally, it was all done. I let it cool and rest for about 15 minutes, and served it up with the sauce drizzled across the top! It was delicious!
Mark has discovered a love of Dutch Oven Cooking. Mark also has other sites and blogs, including MarkHansenMusic.com and his MoBoy blog.

Another father there, also named Mark, was very enthusiastic about Dutch ovening, and he and I got to talking about game meats. He’s an avid hunter, and I have relatively little experience cooking wild game. I got a lot of good ideas and tips from him, and we had a lot of fun talking together.
So, when I came back, I remembered that I had a few pounds of ground game. It had been given to us by my sister-in-law. It was wrapped, but unlabeled in our freezer. I suspect it was elk, but I’m not certain. I wracked my brain trying to think of something to do with it, and after some research, I settled on a few meatloaf recipes to blend together.
If an animal has been field-dressed well, it will go a long way toward removing the “gaminess” of the flavor. Acids and herbs can do much for that as well. There are plenty of both in this recipe, both in the meat and the sauce.
12” Dutch oven
10-12 coals below
18-24 coals above
8” Dutch oven
10-12 coals below
Ingredients
Meatloaf:
2 pounds ground venison
2 large eggs
2 8 oz cans tomato sauce
1 medium onion, finely chopped
1 1/2 teaspoon sea salt
1/2 teaspoon freshly ground black pepper
2-3 tablespoons mustard
2-3 tablespoons apple cider vinegar
Liberal sprinklings of:
Parsley
sage
thyme
oregano
Not so liberal sprinklings of:
Chili powder
2-3 large potatoes, quartered and sliced
Sauce:
~1/4 cup juices from the meat
3 small apples, peeled and grated
6 ounces tomato paste
1 small onion, diced
2 tablespoons apple cider vinegar
2 teaspoons paprika
2 teaspoons cinnamon
1 teaspoon salt
1/2 teaspoon red pepper flakes
1/4 teaspoon freshly ground black pepper.
After thawing the meat in the fridge overnight, I started, as I usually do, by lighting up some coals and letting them get a bit white.
The meatloaf was actually very easy to make. I simply mixed everything up in a bowl (except the potatoes). Then I spread it around in the Dutch oven. It was originally my intention to make a loaf mound of meat in the middle of the Dutch oven, and then to scatter the potato bits around it to fill it in. However, I think I actually had closer to 3 pounds of meat, so I was able to cover the whole dutch oven with some depth. So, I just tossed the potatoes evenly over the top.
It baked for probably about an hour before the internal temperature read 150. Really, it’s fine if it goes over that.

Finally, it was all done. I let it cool and rest for about 15 minutes, and served it up with the sauce drizzled across the top! It was delicious!
Mark has discovered a love of Dutch Oven Cooking. Mark also has other sites and blogs, including MarkHansenMusic.com and his MoBoy blog.
Tuesday, October 29, 2013
Dutch Oven Long Roasted Beef Brisket

Well, this last weekend, I had the chance! We were at a campground up at Bear Lake with a group of families with children with special medical needs. The group is called “Hope Kids” and we’ve got many wonderful friends in it.
So, for dinner saturday night, I cooked this brisket. It was about 11+ pounds, and at a rate of about a half hour per pound, that meant a good 6-hour cook time. So, I started at about noon.
Dutch Oven Long Roasted Beef Brisket
1x 14” Deep Dutch oven
14-16 coals below
16-20 coals above
1 Beef Brisket, anywhere from 8-12 lbs (figure about 1/2 lb per person)
Mark’s Meat Rub
1 Tbsp cumin
1 Tbsp crushed coriander
1 Tbsp garlic powder
1 Tbsp coarse ground black pepper
1 Tbsp thyme
2 Tbsp paprika
2 Tbsp salt
1 tsp oregano
...and I added some chili powder this time
The Sauce
1 6 oz can of tomato paste
1 8 oz can of tomato sauce
Brown sugar (or regular sugar and molasses)
Mustard
Salt
Pepper
Some kind of hot spice (Cayenne Pepper or Chili powder)

I lightly oiled the inside of my 14” deep Dutch oven, and for a while, I contemplated using an overturned metal pie plate as a trivet to raise the meat up out of the juices that would drip out. Usually, when I do a roast, I’ll put in a layer of quartered onions and potato chunks for that purpose, but with a 6-hr cook time, they would be pretty much mush by the end of it.. In the end, I decided that the brisket would fit better if I just put it on the bottom and draped it up the sides.
With the meat in place, I put it on the coals as above. I stuck in a thermometer, mostly just to monitor progress. It will cook waaay past “done”.
This is the kind of cooking that I especially like. I can just sit back and relax with a soda and watch the coals burn. About every 20-30 minutes, I’d pull a few coals out of the chimney and replenish them on the oven. I’d usually put about four around the bottom and six or so on top. Then, I’d add more fresh coals to the pile to light up. While I was doing this, friends and families that were camping with us would come by and chat. I got to meet a few people who are Dutch oven chefs, and a few who’d actually bought my books.
About 2 1/2 hours it, the meat was at about a medium done-ness, and it hit “well done” at probably an hour and a half later. I just kept on cooking and rotating the coals. At about 4:00, I started to work on another 14” pot of au gratin potatoes, a smaller version of which can be found here.
Finally, about an hour before serving time, I mixed up the BBQ sauce. When I mix this up, I make it like a good jazz tune, with lots of improvisation. I start with a core of the tomato, the mustard, and the sugar (or in this case, the molasses), and then I keep adding flavors and things one at a time until it all balances. Too sweet? Too tomato-y? Add more mustard. Too tangy? More sugar and molasses. Not enough edge? More black pepper and chili powder... And always just enough salt to make it come alive. I basted that over the visible surface of the brisket and let it bake on. I did this two or three times, and the remaining sauce, I reserved for drizzling at service.
When it was all done, and time to eat, I cut the brisket in half and put half on my cutting board. I cut thin slices against the meat’s grain, and served that with a drizzle of additional BBQ sauce. It was so juicy and tender and delicious. The sauce and the rub really added to the overall flavor. I was really proud of it. I want to do this again and again!
Mark has discovered a love of Dutch Oven Cooking. Mark also has other sites and blogs, including MarkHansenMusic.com and his MoBoy blog.
Thursday, October 10, 2013
Dutch Oven Cauliflower Soup
This one was all my wife’s idea. I like cauliflower OK, but I’m not a big fan of it. She found a recipe and I thought it looked interesting, so I thought I’d give it a go. Interestingly enough, if I’d used a veggie stock for the base instead of chicken broth, (and without the ham), it could have been a vegetarian dish (depending, of course, on which flavor of vegetarian you happen to be).
Like we often do, we disagreed on one important point. She wanted me to make the recipe just as it was. I guess she wanted to see how close it was to the restaurant dish it was supposed to be mimicking. So, after I made it tame and straight for her, I pulled about a third of it off and mixed in my own flavorings in (including the ham). So, since I’m writing the blog, this recipe is mine, and if you want you can flavor yours however you like.
12” Dutch oven
20-24 Coals below
8 Tbsp (1 stick) butter
2 Med Onion
4-5 cloves minced garlic
Salt
Pepper
1/2 cup flour
2 Cups half-and-half
2 Cups milk
1-2 tsp nutmeg
2 14.5 oz can chicken broth
2 1/2 lbs chopped cauliflower
1 Tbsp mustard
Juice of 1 lemon (with zest, if you like)
1 tsp red pepper flakes
Parsley
2-3 cups cheddar
2 cups cubed ham
1/4-1/2 cup grated Parmesan
1/4 cup fresh chopped chives
I started out by lighting up the coals, and, when they were white, counting them out and putting my Dutch oven over them to heat up. While that was preparing, I minced the garlic, and diced the onions. I melted the butter, and put in the onions and the garlic. I added the salt and pepper, too. When that had gotten translucent, I added the flour and stirred it all up. I let that cook for a while, stirring pretty much constantly, until I could smell that rich nuttiness along with the garlic. Oh, it was great!
Then, I mixed in all the liquids of the second set. I stirred it up and put the lid on. I had to keep replenishing the coals underneath. It’s important to be careful, because if you get too much goin’ on under there, then you can burn the liquid onto the bottom of the pot. Not good. I also stirred it up a lot. Once it got bubbly, I was even more careful with the heat, to maintain a simmer instead of a rolling boil. The main idea in this step is to cook the cauliflower. It takes about 15 minutes, once the bubbles come.
Once the cauliflower is cooked, then it’s time to chop and blend it all up. I could have used our hand blender, but I knew I’d have to have more oopmh. I used our electric immersion blender. I had to angle it so that the chunks of cauliflower could get under the blades. Blend it to your desired consistency. I did it pretty creamy this time. I kinda like some substance, so I think in the future I’d leave some bigger chunks.
After it blends, then start adding in the flavors you’d like. I included the ones I have here because they were easy to grab, and I think they made a really good combination of sour and sweet tones, along with the undertones of the cream. I let those flavoring simmer in for a while, stirring frequently.
In the last few minutes of cooking, I added in the ham and the cheeses. The cheeses melt into the soup, and bond with the flour and the milk and cream. Without the flour, it would be a chunky, clunky, melted mess.
Finally, it was done. I served it up, with the chopped chives as a garnish on top.
Mark has discovered a love of Dutch Oven Cooking. Mark also has other sites and blogs, including MarkHansenMusic.com and his MoBoy blog.
Monday, October 7, 2013
Food and Politics Part IV: Local Food
So, I read over here: http://edible-wasatch.ppwd.stackablehost.com/edible-utah-events/eatlocalweek that this week is "Eat Local" week. It's a week of events, mostly in the Salt Lake City Metro area, designed to raise awareness of and to celebrate the "Local Food Movement". The idea is to try and eat foods that were produced within 250 miles of your home.
I'm not one to jump in on food movements. I'll occasionally make a meal that's vegetarian, and I like to shop at farmer's markets and I've even been in a food co-op from time to time. I'm fascinated by deconstruction, and even molecular gastronomy. I love to explore the world's food.
But even with all that. I'm not really committed to any one of them. Except cooking them outdoors, or in Dutch ovens. I pretty much stick with that. It's kinda my schtick.
The local food movement is something, however, that I've always liked. As I said, I love shopping at farmer's markets, and I like getting things from the roadside stands that are all over Utah in the later summer and early fall. I think it's great to buy from smaller local farms. Here are some thoughts.
1 - When you shop for local food, you never really know what you'll get, and shopping is a bit of an adventure. Sometimes, I'll go there without an idea of what I want to cook. Then, I get my ideas from what I see. I think that's a lot of fun. Sometimes, what you get is more flavorful and colorful than the supermarket competition. Other times, it's on par. It's that variability that ads flair, I think.
2 - I was in a larger supermarket, a Smith's, the other day, and saw that they were putting up displays that celebrate local food. In the produce section, for example, next to some of the veggies, were pictures of the farmers that had produced what was in the bin. So, sometimes you can get local with the convenience of the supermarket.
3 - I remember one time last summer, I stopped off at a street corner produce stand, and in talking with them, found out that the corn they were selling had been trucked in from California the night before. Local food? Not so much...
Overall, I think it's a great idea. In the past, I've tried to shop local food whenever it was easy and convenient. I think that, in the future, I'll make a broader effort to include local foods in my ingredients and mention that whenever I can in the blog. You know, food trends come and go, but I think this is one worth building on.
Thursday, October 3, 2013
Dutch Oven Soft Dinner Rolls

Or, in this case, still not quite not there...
Dutch Oven Soft Dinner Rolls
10" Dutch Oven
10 Coals below
20-22 coals above
2 tsp yeast (or 1pkg}
I/4 cup warm water (105°F-110°F)
1/2 Tbsp sugar
1 cup milk, just to scalding hot (do not simmer or boil)
¼ cup melted butter
4 cup bread flour
1 tsp salt
1 egg, lightly beaten
2 T butter, melted, for brushing
The process for these rolls was very similar to my standard process for bread, with a few changes. I started out by activating the yeast in a bowl with the warm water and the sugar. I set that aside to get frothy for about 10 minutes or so.
Then, I heated up the milk and the butter. If I'd been out in the wild, I could've done this in a dutch oven, like my 8", over about 12 coals, but since I was in a bit of a hurry, I did it in the microwave. May the Gods of Iron forgive me.
I sifted the bread flour into a mixing bowl, and added the salt and the egg. I stirred in the yeast mix and the milk mix. It was pretty sticky still. When I turned it out on the table and started kneading, I didn't add much flour on the table. I wanted it to be a pretty wet dough, to make it lighter. Not quite so wet as the no-knead or a ciabatta/focacia dough, but definitely more loose than a regular sandwich bread as well. I kneaded it to a good windowpane. Then I oiled the bowl, and set the dough aside, covered, to rise.
I let it rise a bit higher than normal, in both the first and second fermentations.
After the first rise, I cut it into eighths and rolled each piece into a small ball. I set these into the base of my oiled 10" Dutch oven. I set these aside to rise, while I lit up some coals. Once the coals were ready, I put about 20-25 of them on the lid of the Dutch oven, to preheat. After about 15-20 minutes of heating, the rolls had risen well. I took them out and set up the coals as listed above, and started the baking.
After about 15 minutes, I turned the lid and the oven, and set the thermometer in the dough. They had sprung up nicely, and were just starting to brown. About 10 minutes later, the thermometer read about 190, and they were ready to come off the coals.
I brought them in, turned them out of the Dutch oven, and set them on a cooling rack. While they were still hot, I coated the top with some butter, which immediately melted onto the crust. Then they cooled while I cooked the rest of the dinner.
As I said before, they were lighter than most loaves I'd done, but not quite the airiness I was shooting for. I think that making the dough wetter helped, as well as the extra rise time. I also think baking to 190 instead of 200 was a part of that as well.
Wednesday, October 2, 2013
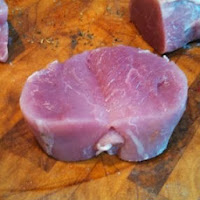
Dutch Oven Pork Loin Medallions
Or
Cooking for Fun!
 I've been so busy lately doing signings, appearances, and demos for my books, especially the new one, that I've forgotten how much fun it is to just cook for the family. I'd forgotten how much I enjoy looking forward to trying something new, that I've never done before. It's truly been a long time.
So, this last weekend, I kinda went over board.
My sister-in-law had given us a frozen pork loin, and I'd been going over in my head what I could do with it. I finally came up with this idea, and when we had to cancel on a birthday party because of car troubles, I jumped at the chance.
But, my dear wife asked if I could make some au gratin potatoes. And some dinner rolls. And I thought it would be cool to round out the meal with a dessert, like brownies!
I ended up doing all four dishes in my Dutch ovens. It was kinda hectic, but the results were sure worth it! Yummy to the core! The potatoes and the brownies already have their recipes enshrined here in the musty pages of the Black Pot Blog, but the rolls and the pork loin do not! Here is the latter, first:
Dutch Oven Pork Loin Medallions
1x 12" shallow Dutch oven
20-24 coals underneath
Liberal shakes of:
Salt
Pepper
paprika
thyme
basil
1 Pork Loin
1 lb Bacon
Juice of 1 lemon
~1/4 cup water
1 heaping Tbsp flour
There really isn't much to this recipe. It's very simple, and the cool thing is that it looks very impressive. Start early in the day by getting the loin thawed under cool water.
I actually made this dish pretty late in the day. I cooked and baked all of the other dishes first, because this one takes the least amount of time and it's the most critical to be served freshest. The first thing to do is to make sure that you have some fresh coals lit.
Then, I mixed up generous amounts of each of the spices. I just kept tasting it with my fingertip until it seemed like the right blend. You can actually use whatever seasonings and herbs you want. This combination turned out really good. I just mixed it in a small bowl.
 The loin came out of the package in two halves. I cut each one into quarters, which were about 2-2 1/2 inches long, then butterflied each piece. To butterfly, slice the piece in half, against the grain, but don't cut all the way through. Almost, but not completely. Then, open the slice up like a book and you have a disc of meat. I lightly dredged the top and the bottom in the seasoning mix. Then I took a single strip of bacon and wrapped it around the side, securing it with a couple of toothpicks. I continued until all the meat was butterflied, seasoned, and wrapped. While it was absorbing the seasonings, I got the oven ready.
 I spread out some coals and set my 12" oven on them. I sprinkled just a little bit of olive oil in the bottom and let it get all shimmery hot. Then, I gently laid each wrapped medallion on the hot oven bottom. After 5-10 minutes, I turned them over and let them cook/sear on the other side. About this time, I put the lid on, so that the internal heat would also cook the meat through. I'm not sure that I needed to do that, though.
When they were done through, I pulled them off and put them on a plate, tented in aluminum foil. I squeezed the lemon juice into the bottom of the pan, and began scraping loose the fond pieces. There was some liquid from the pork in the bottom as well, so that helped. I added the flour to the water and stirred it thoroughly, and then began adding that into the pot to thicken and smooth the juices into a pan sauce.
In the end, I served the medallions up with the potatoes and the rolls, drizzled with just a little hint of sauce. It was truly elegant and delicious!
Cooking for Fun!

So, this last weekend, I kinda went over board.
My sister-in-law had given us a frozen pork loin, and I'd been going over in my head what I could do with it. I finally came up with this idea, and when we had to cancel on a birthday party because of car troubles, I jumped at the chance.
But, my dear wife asked if I could make some au gratin potatoes. And some dinner rolls. And I thought it would be cool to round out the meal with a dessert, like brownies!
I ended up doing all four dishes in my Dutch ovens. It was kinda hectic, but the results were sure worth it! Yummy to the core! The potatoes and the brownies already have their recipes enshrined here in the musty pages of the Black Pot Blog, but the rolls and the pork loin do not! Here is the latter, first:
Dutch Oven Pork Loin Medallions
1x 12" shallow Dutch oven
20-24 coals underneath
Liberal shakes of:
Salt
Pepper
paprika
thyme
basil
1 Pork Loin
1 lb Bacon
Juice of 1 lemon
~1/4 cup water
1 heaping Tbsp flour
There really isn't much to this recipe. It's very simple, and the cool thing is that it looks very impressive. Start early in the day by getting the loin thawed under cool water.
I actually made this dish pretty late in the day. I cooked and baked all of the other dishes first, because this one takes the least amount of time and it's the most critical to be served freshest. The first thing to do is to make sure that you have some fresh coals lit.
Then, I mixed up generous amounts of each of the spices. I just kept tasting it with my fingertip until it seemed like the right blend. You can actually use whatever seasonings and herbs you want. This combination turned out really good. I just mixed it in a small bowl.

 I spread out some coals and set my 12" oven on them. I sprinkled just a little bit of olive oil in the bottom and let it get all shimmery hot. Then, I gently laid each wrapped medallion on the hot oven bottom. After 5-10 minutes, I turned them over and let them cook/sear on the other side. About this time, I put the lid on, so that the internal heat would also cook the meat through. I'm not sure that I needed to do that, though.
When they were done through, I pulled them off and put them on a plate, tented in aluminum foil. I squeezed the lemon juice into the bottom of the pan, and began scraping loose the fond pieces. There was some liquid from the pork in the bottom as well, so that helped. I added the flour to the water and stirred it thoroughly, and then began adding that into the pot to thicken and smooth the juices into a pan sauce.
In the end, I served the medallions up with the potatoes and the rolls, drizzled with just a little hint of sauce. It was truly elegant and delicious!
Monday, September 2, 2013
Book 4: Dutch Oven Breads is about to fly!
It's getting exciting! Only a little over a week until the official release of my fourth book, "Dutch Oven Breads"! This last weekend, Brendon and I shot and edited this video:
And here's the link where you can place your Amazon.com order!
Thanks so much for all your support over the years. Even if you can't buy the book right now, jump to YouTube, and "thumbsup" the video, or share it on your facebook. If you have gotten the book, please post a review on Amazon!
Thanks so much!
Mark has discovered a love of Dutch Oven Cooking. Mark also has other sites and blogs, including MarkHansenMusic.com and his MoBoy blog.
Thursday, August 29, 2013
Dutch Oven Slow Elk Roast
A friend of mine was in a quandry. His son had left their garage freezer door opened, and much of the meat stored there had thawed. He facebooked me and asked if I wanted some elk roasts. While I felt sorry for his loss, it was about to be my gain!
I picked it up and did some web searching to try and find some good recipe ideas. Fortunately, there were plenty!
Dutch Oven Slow Elk Roast
12” deep Dutch Oven
20+ coals below
10-12 coals below
12-14 coals above
4-6 lbs elk roast (boneless)
4-6 cloves of fresh garlic, halved
Olive oil to brown the roast
Salt
Pepper
Herbs (sage, rosemary, parsley)
1 cup cranberry juice
2 cups beef stock
1 large onion, quartered
3-6 stalks celery
3-4 carrots
4-6 roma tomatoes
3-4 potatoes, in larger cubes, or a dozen small “baby” potatoes
I started by preparing the meat. I used a paring knife to cut some deep gashes in the meat, on both sides, and I stuffed the halved garlic cloves in the holes. Then, I salted and peppered each side, and rubbed on the dried herbs. I set that aside so the meat could absorb the flavors.
While that was happening, I set some coals on to burn, and when they were white, I put them under the Dutch oven, with a little olive oil in the bottom.
When the Dutch oven and the oil were heated, I laid in the elk roast pieces (there were two), and let them sear on each side. Then, I reset the coals to have some on top and some underneath, as the numbers up above represent. I added some fresh coals into the chimney, too, to begin heating. I added in the cranberry juice and the beef stock. My intent was to keep the internal temperature of the Dutch oven to between 250 and 300, and to roast it and braise it for a long time. That would tender it up, and the harsh acidity of the cranberry juice would lessen any of the “gamey” flavor.
After about an hour, I chopped up and added the vegetables. Really, it was pretty simple. I just kept refreshing the coals. It was very relaxing. I cooked it for over three hours. In between all that, I made an apple pie (which I will post soon).
Every once in a while, I would take a couple of forks and pry at the meat. When it came apart easily, it was done, and I brought it in. I let it rest with the lid on for a while (with no coals, of course). While that was resting, I used a basting syringe to pull out the juices, and I got that boiling in my 8” Dutch oven. I whisked together about 2 tablespoons of flour and 1/4 cup water in a bowl and gradually stirred that into the boiling juices, to make a gravy.
It was delicious! The meat was nice and not gamey at all.
Mark has discovered a love of Dutch Oven Cooking. Mark also has other sites and blogs, including MarkHansenMusic.com and his MoBoy blog.
Tuesday, August 13, 2013
Utah Book Month Share!
Young Chefs: Cooking Skills and Recipes for Kids
By Christina Dymock
As a part of the Utah Book Month, I get to Spotlight another Utah author and her book, and I’m very excited about it. The author is Christina Dymock and the book is called, “Young Chefs: Cooking Skills and Recipes for Kids”. As I was perusing her site and the sample pages of her book, it really took me back to helping my own kids learn how to cook.
Those of you who’ve been following the Black Pot here for any length of time know that I haven’t been cooking very long. Only about 7-8 years. Which means that when I started, Brendon, my oldest, was only about 9.
Right from the beginning, he was wanting to help me, and he and I cooked together a lot. My other son, Jacob, has Cerebral Palsy, and so he is often there with me as I cook, but his direct, hands-on involvement isn’t so much as Brendon’s.
Unfortunately, Brendon’s culinary education has been pretty haphazard, as has been my own. We didn’t really have a well-outlined “curriculum” to help us learn. This book would have really come in handy that way. Brendon turned to the world of “Chopped” and “Iron Chef” to learn his techniques. He and his friends would randomly pull “secret ingredients” from the pantry, give them to each other and challenge them to see who could make the tastiest dish from them. I was, sadly, often the judge.
But then, there were other hits, like his Dutch oven Creme Brulee, complete with the torch, and the time I came home from a hard day of work to a fully scratch-made apple pie.
I guess, in the kitchen, as in life, there will always be hits and misses. I just think that with a well-ordered book like this one, with chapters nicely spelled out for main dishes, sides, desserts, breakfasts, and others, with many ideas and pages that teach real skills, there would probably be a lot more hits than misses.
My son loved to experiment with smoothies. His banana grape mint smoothie is legendary at our house. Here’s one of Christina’s:
Sunshine Juice
Serves 6
Ingredients:
1 Cup milk
1 Cup water
1 tsp vanilla
1/2 Cup frozen orange juice concentrate
1/4 Cup sugar
1 Cup ice
What You Do:
1 - Put the milk, water, vanilla, orange juice concentrate, sugar and ice in the blender.
2 - Put the lid on tight.
3 - Blend on Low for 1 minute or until the ice is chopped up.
4 - Pour into cups and serve.
Now, seriously, what kid wouldn’t love drinking this and saying, “I made it!”
Mark has discovered a love of Dutch Oven Cooking. Mark also has other sites and blogs, including MarkHansenMusic.com and his MoBoy blog.
Tuesday, July 23, 2013
Dutch Oven Tandoori Chicken

But then, I realize that it might not be true, authentic tandoori chicken, but the spices will still glaze on the chicken and it will still taste great.
Once I’d lost the worry about authenticity, it was an easy mental jump to do it in the Dutch oven. There was one problem, however: the dry heat. In order for the marinade to glaze on, I would need very high and dry heat. I’ve done that a lot of times with the “lifted lid” or “dry roasting” technique. So, we’re good to go!
I did two whole chickens, but the marinade could be halved to make just one.
Dutch Oven Tandoori Chicken
12” deep Dutch oven
Phase one: roasting
12-14 coals below
14-16 coals above
Phase two: dry roasting
12-14 coals below
24-28 coals above
8” Dutch oven
10-12 coals below
2x medium roasting chickens, whole, no neck or giblets
1 cup plain yogurt
1 6 oz can tomato paste
Juice and zest of 1 lemon
1 tsp hot chilli powder
1 tsp turmeric
1 tsp ground coriander
1 tsp ground cumin
2 tsp garam masala
1 tsp ground cinnamon
2 tsp ground ginger
2 tsp garlic powder
salt
pepper
2-3 medium yellow onions
2-3 lemons
13.5 oz can coconut milk
1 Tbsp corn starch or flour
The first task is the marinade, and I did that the night before. I simply mixed the yogurt and all of the spices and flavorings of the second set of ingredients in a bowl. Then, I opened up the chicken bags, drained them and patted them dry. I also pulled out the neck and giblets. I got out a sharp slicing knife and made some cuts across the breast and the thighs and legs. This is so that the marinade can get down under the skin and even more into the meat.
I saved the big plastic bag that the two chickens had come in, and put them back in, pouring all of the yogurt and spices on top. I worked the bag so that the marinade covered all of the surfaces of the chicken. You could just put it in bowl and rub it all over, finally covering it with plastic wrap. Coating the marinade on the chicken is a very, very messy task.
I put the coated chicken back in the fridge overnight.
When the time came to start cooking, I lit up some coals, and got out my 12” deep. At first, I was a little concerned that the chickens might not fit, and that I’d have to use a 14”. In the end, it was fine.
I halved each onion and then quartered each half, and tossed the wedges into the bottom of the Dutch oven. I did the same to the lemons and stirred them around. These would not only add flavor to the eventual gravy, but would also lift the chicken up above the juices.
I set the marinated chickens (again, what a mess) onto the onions and lemons. As an afterthought, it might be cool to stuff an additional cut lemon and onion into the body cavity of each chicken. Had I thought of it, and had it not been so messy, I might have. At any rate, I tucked the chickens in snugly next to each other and took the Dutch oven out to the coals.
Phase one of the cooking is just basic roasting. I let it roast for about an hour, or until the chickens came up to about 160°F internal temperature. Almost done, but not quite. I replenished the coals a couple of times, as it was quite a breezy day.
Then, in phase two of the cooking, I did the dry roasting. I opened up the lid, and first extracted the juices on the bottom with a poultry baster. The juices, I put into my 8” Dutch oven.
I set my Dutch oven up to do dry roasting. This is basically having something that raises the lid a bit so that the moisture can escape. I have a circular grill grid that’s just a little larger than 12” and it fits very nicely over my Dutch ovens. There are other things you can use, like nails bent into the shape of a “U” and hooked over the rim of the oven. Whatever raises the lid a little bit.
Since the moisture is no longer trapped, the heat isn’t trapped, either, so you need to use a lot more coals. So, once the lid is back on and sitting on the lifters, pack the coals on it!
I like to cook chicken and turkey to about 175°F or 180°F. While that was cooking, I put some coals under my 8” Dutch oven and started simmering the juices. I added the coconut milk, and let that simmer and reduce some. In the end I added some starch whisked in water to thicken it up as well.
When it was all done, I had also made some rice and heated up some green beans for the full meal. I carved it up and served it. It still was quite moist, not as dry as I thought it would be. It truly wasn’t an authentic tandoori chicken, as I said, but it was delicious!
Mark has discovered a love of Dutch Oven Cooking. Mark also has other sites and blogs, including MarkHansenMusic.com and his MoBoy blog.
Wednesday, June 26, 2013
The Politics of Food - Part II
--OR--
First a Racist, then a Sexist
I’m a basically religious guy.
I know this might surprise you, but in spite of that, I don’t agree with everything that other religious people say.
Recently, I’ve been participating in a discussion of the roles of women in Christian churches. Some say that young women should be trained and raised up to be wives, mothers, and homemakers. Others say that they should pursue careers and seek fulfillment beyond the home. Some say that husbands and wives can balance their home, family, and career roles.
...And somehow food gets caught in the middle. “Girls should be taught to cook and clean and care for her husband and children!” “I’m not going to sit at home baking pies and breads!” “Make me dinner!” “Make it yourself!”
Which to me is sad. Because I think of food and cooking as an enjoyable part of my life, not a symbol of my oppression or of my enlightenment. I LIKE to cook. My son LIKES to cook. My wife is a great cook. My sister is an excellent chef, and she married another one. She and he have both taught me much of what I know about food. My mother was a great cook, and a devout feminist. Now, as her health fails, my father cooks for her daily.
Why should baking a pie represent anything more or less than having a great time making something delicious? Baking bread is cathartic and wonderful. Why is that symbolic of oppression?
C’mon. It’s just food, people...
Next, we're back to recipes. I promise. Really.
Mark has discovered a love of Dutch Oven Cooking. Mark also has other sites and blogs, including MarkHansenMusic.com and his MoBoy blog.
The Politics of Food - Part I
-or-
Xenofoodia
There have been a couple of circumstances lately where people have gotten into personal and political troubles, with food in the middle of it. I feel a need to share my thoughts about them both.
The first is, of course, the fury over the Food Network not renewing Paula Deen’s contract, over alleged racist comments. In addition, some of her sponsors are also now dropping Paula like a hot baked potato.
Let me get some things out of the way, first: It’s a free country. Paula Deen can say whatever she wants, for whatever reason she has, and the Food Network can hire or fire whoever they want, for whatever reason they have. Neither impacts my life in any direct way. I’m not writing about whether or not they’re allowed to do either one. Whether or not they SHOULD do what they’ve done is also an interesting question, but not one that I am going to deal with. Each decision will have consequences.
In fact, I suspect that Paula Deen’s TV demise has much less to do with outrage over racism, and more to do with the trends and directions of the Food Network. For quite a long time, they’ve been moving away from traditional cooking instruction shows, and more toward competitions and restaurant reality shows. That Paula Deen happened to come across in a bad light simply gave them a good excuse to cut her off.
And if that isn’t enough, there’s this, just in: Nabisco’s new watermelon Oreos are “racist”. That is, of course, if you didn’t already make all kinds of race-related jokes and metaphors out of the original chocolate and cream flavor.
One thing that came up in my mind, however, was a part of the bigger food culture picture. Racism, in all it’s forms, occurs when two cultures meet, and one or both is unaccepting of the other. America has a longstanding tradition of welcoming people of different heritages. That’s why we’ve been called the melting pot. We’ve historically had lots of problems with that, too, as worlds and cultures clashed. It seems, however, that in the culinary world, we like getting along. American food culture is a delicious blend of many many cultures.
I’d like to think of us more as a stew pot. A good stew is made of lots of ingredients. As it cooks, each gives its own flavor to the whole, while receiving flavors from around it, and retaining its own tastes and characteristics. There is a homogenous overall taste, but the individuality of each ingredient also shines through.
We need to develop that stew mentality. Each culture can retain and celebrate their own uniqueness, while all becoming American.
Don’t you wish it were all that easy?
Mark has discovered a love of Dutch Oven Cooking. Mark also has other sites and blogs, including MarkHansenMusic.com and his MoBoy blog.Xenofoodia
There have been a couple of circumstances lately where people have gotten into personal and political troubles, with food in the middle of it. I feel a need to share my thoughts about them both.
The first is, of course, the fury over the Food Network not renewing Paula Deen’s contract, over alleged racist comments. In addition, some of her sponsors are also now dropping Paula like a hot baked potato.
Let me get some things out of the way, first: It’s a free country. Paula Deen can say whatever she wants, for whatever reason she has, and the Food Network can hire or fire whoever they want, for whatever reason they have. Neither impacts my life in any direct way. I’m not writing about whether or not they’re allowed to do either one. Whether or not they SHOULD do what they’ve done is also an interesting question, but not one that I am going to deal with. Each decision will have consequences.
In fact, I suspect that Paula Deen’s TV demise has much less to do with outrage over racism, and more to do with the trends and directions of the Food Network. For quite a long time, they’ve been moving away from traditional cooking instruction shows, and more toward competitions and restaurant reality shows. That Paula Deen happened to come across in a bad light simply gave them a good excuse to cut her off.
And if that isn’t enough, there’s this, just in: Nabisco’s new watermelon Oreos are “racist”. That is, of course, if you didn’t already make all kinds of race-related jokes and metaphors out of the original chocolate and cream flavor.
One thing that came up in my mind, however, was a part of the bigger food culture picture. Racism, in all it’s forms, occurs when two cultures meet, and one or both is unaccepting of the other. America has a longstanding tradition of welcoming people of different heritages. That’s why we’ve been called the melting pot. We’ve historically had lots of problems with that, too, as worlds and cultures clashed. It seems, however, that in the culinary world, we like getting along. American food culture is a delicious blend of many many cultures.
I’d like to think of us more as a stew pot. A good stew is made of lots of ingredients. As it cooks, each gives its own flavor to the whole, while receiving flavors from around it, and retaining its own tastes and characteristics. There is a homogenous overall taste, but the individuality of each ingredient also shines through.
We need to develop that stew mentality. Each culture can retain and celebrate their own uniqueness, while all becoming American.
Don’t you wish it were all that easy?
Saturday, June 22, 2013
Dutch Oven Boneless Buffalo Chicken
Check out my Dutch oven cookbooks!
 This one is the last installment in my series on breaded chicken strips and sauces. It's been a lot of fun thinking of new configurations for an old standby.
I’m a big fan of hot sauce, and I’ve always wanted to be able to make it from scratch. I had done some studying a long time ago, and I read about having to store it and let it ferment for months and months. That wasn’t going to happen. Most of the other recipes for wing sauce I found were all based on Frank’s.
Finally, I morphed a bunch of ones that I saw into this one. It was a great sauce. The amounts are estimates. Really, I just added these things and kept tasting to get it to the point where I liked it. The core ingredients were the butter, the tomato sauce, the heat, and the vinegar.
Dutch Oven Buffalo Chicken
12” Dutch oven
20+ coals below for frying
10 coals below for baking
30+ coals above
8” Dutch oven
12+ coals below
The Sauce
1/2 stick (4 Tbsp) butter
1/2 onion, minced
2-3 cloves garlic, minced
1 stick (8 Tbsp) butter
2 8 oz cans tomato sauce
~1 Tbsp cayenne
~2-3 Tbsp vinegar, to taste
1 4 oz can mild green chilis, minced
Salt
Pepper
Chili powder or more cayenne to taste
The Chicken:
2 lbs boneless & skinless chicken breast tenders
1/4 cup all purpose flour
1 tsp black pepper
1 tsp kosher salt
1 tsp paprika
The procedure for this dish was similar to the other two (the sesame cashew chicken Dutch oven recipe and the chocolate chicken Dutch oven recipe ), in some ways, and in one big way, different. I still fried dredged chicken breast pieces, then made a sauce. Finally I coated them with sauce and baked that on, serving it all up with just a little more sauce and side dishes.
In this case, however, since I wanted to give the sauce plenty of time to simmer, I started with it.
I lit up some coals, and once they got white, put 10-12 of them under my 8” Dutch oven. I put in the butter to melt. Then I diced and finely minced the onion and the garlic. By that time the Dutch oven was hot, and the butter melted. I tossed in the onion bits and garlic, with a little salt, and let them sweat.
Once those were translucent, I added in the additional butter, let it melt, and then added the tomato sauce, the cayenne, and the vinegar. These four ingredients (well, and salt) are really the core of the whole dish. I let it simmer a while, then started tasting it. I added a little more of the cayenne or the vinegar to balance the overall flavor.
 Finally, I minced and added the green chilis, and the salt and pepper, and just let it simmer. I used a whisk to briskly stir it up and break up the chunks as much as possible.
In between simmerings and tastings, I was also preparing the chicken. This was done just like the other dishes. I first got about 20-24 lit coals under a 12” Dutch oven, with about 2 Tablespoons of olive oil in the bottom.
I mixed up the flour and spices. I sliced the well-thawed chicken breasts (skinless, boneless) into 3-4 short strips each, and dredged each chicken piece well in the flour mix. Then, I began frying those pieces in the heated 12” Dutch oven. I had to do it in several batches, because I had more chicken pieces than I could fit into the bottom of the Dutch oven. I cooked each piece about 10 minutes a side. I had to pay close attention to the heat under both Dutch ovens, so that the chicken would brown nicely, and the sauce would keep up an easy simmer.
When all of the chicken was done, I put it all in the 12” Dutch oven and drizzled about half the sauce on top. I stirred all that great chicken and sauce up, so I could see that each piece was well coated, but not soaked. I put about 10 coals under that Dutch oven, and put a 12” circular grill on top of it. Then I put on the lid with upwards of 30 coals on it. The grill makes a space under the lid, so that moisture can escape. The extra coals on top are needed to make up for the heat that escapes as well. This creates a dry-baking environment, and the sauce cooks on to the chicken in sort of a glaze. There are lots of things you can do to create the gap in the lid. The grill is just one convenient way for me.
I didn’t need to bake it long, because everything is actually cooked at that point. I used that extra time to steam a few corn cobs in another 12” dutch oven as a side dish.
When I served it up, I included some celery strips, and some blue cheese or ranch dressing as an additional sauce to balance out the heat of the sauce. I was very pleased with the results. It was delicious! Unfortunately, the acidic sauce also ate the patina off patches of the bottom of my 8” Dutch oven, so now I have to reseason it!
It was worth it!
Here are more great Dutch Oven Chicken recipes!
Mark has discovered a love of Dutch Oven Cooking. Mark also has other sites and blogs, including MarkHansenMusic.com and his MoBoy blog.
Monday, June 17, 2013
Dutch Oven Brownies

I’ve recently been discovering just how much I like molasses as a flavoring. It sweetens, but it also adds a depth and richness. I don’t know how else to say that. I really like it.
10” Dutch oven
9-10 coals below
18-22 coals above
Ingredients
Soft butter, for greasing the pan
Flour, for dusting the buttered pan
4 large eggs
2 cup sugar
1 Tbsp molasses
8 ounces melted butter
11/4 cups cocoa
2 teaspoons vanilla extract
1/2 cup flour, sifted
1/2 teaspoon kosher salt
1 16 oz bag chocolate chips
I started by lighting up a lot of coals. While that was catching, I broke the eggs into a bowl and began whisking. I beat them for a good 15 minutes or so, until they were smooth, creamy and getting a bit fluffy, a light yellow. I was surprised just how thick and airy the brownies ended up (airy for brownies, that is). I added in the sugar and molasses, and whisked it all together.
I got out the 10” shallow Dutch oven and put about 24 or so coals on the lid to preheat. Then, I buttered the base of the Dutch oven pretty heavily, and dusted it with flour as well. I was planning on cutting and serving the brownies directly from the Dutch, so I didn’t put any parchment down. Had I been planning on extracting it as a disc, like a cake, I would have cut a parchment circle and put it down.
While the lid was heating, I added all of the remaining ingredients into the bowl and whisked and stirred some more. I worked it until it was smooth, which didn’t really take long. I held back some of the chocolate chips for later.
I poured the batter into the Dutch oven, and took it out to the coals and put the lid on. Then, I adjusted the coals to the numbers shown above, and marked the time. After 15-20 minutes, I rotated the oven a quarter turn, and the lid as well, to prevent burns from hot spots. After another 15-20 minutes, I turned it again, and lifted the lid to check on the progress. I checked it with a toothpick in the center. Almost done!
After about another 10 minutes, the toothpick came out clean, and I pulled it off the coals. I brought it in and let it cool, uncovered. It’s tough, but I encourage you to resist the urge to eat it too quickly. Let it cool, at least until it’s just barely warm. While it’s still hot, scatter the remaining chocolate chips over the top and let the residual heat melt them. Another alternative topping is to sprinkle it with powdered sugar through a sifter.
We loved them! Especially after eating the chocolate chicken. A week or so later, my son cooked this up (increased for 2 12” Dutch ovens) at his scout campout, and won his troop the Golden Spatula!
Mark has discovered a love of Dutch Oven Cooking. Mark also has other sites and blogs, including MarkHansenMusic.com and his MoBoy blog.
Thursday, June 6, 2013
Dutch Oven Chocolate Chicken
...What?
Chocolate what?
No. Stinking. Freaking. Way. What are you thinking? Chocolate chi-- What?
 See, it all started when my wife was preparing a lesson for church on Sunday about God’s love. She found this funny quote that says, “Chocolate is proof that God loves us all!” While we talked about ways to work that into the lesson (involving a handout with Hershey’s Kisses), I got an idea in my head for a day of cooking with chocolate.
I did some research, and I found a great brownie recipe (which will follow another day), but I wondered what to do for the main dish. I thought about a mole of some kind, and I started looking for recipes. I found, instead, a recipe for a chocolate-based barbecue sauce. Immediately, I thought of the cashew chicken I had done in the previous post. I would do a dredged, crispy fried chicken, and then dry-bake on the sauce!
Though many of the processes are the same as that last dish, there are a few differences, so I’ll write it out again.
Dutch Oven Chocolate Chicken
12” Dutch oven
20+ coals below for frying
10 coals below for baking
30+ coals above
8” Dutch oven
12+ coals below
2 lbs boneless & skinless chicken breast tenders
1/4 cup all purpose flour
1 tsp black pepper
1 tsp kosher salt
1 tsp paprika
4 tbsp. unsalted butter
2-3 cloves garlic, minced
1 small yellow onion, minced
1 1.5 oz. chocolate bar, broken into chunks
1 8ox can tomato sauce
1/2 cup sugar
2 tsp molasses
2 tbsp. vinegar
2 tbsp. unsweetened cocoa powder
2 tbsp coffee grounds or powdered coffee substitute, like Pero
2 tbsp Dijon mustard
2 tsp. chili powder
2 tsp. kosher salt
1 tsp. ground black pepper
First of all, make sure that the chicken is fully thawed before you even start.
I started out, as I usually do, by firing up some coals. Once I had a few that were getting a bit white, I spread about 20 or more out on the table and put the 12” Dutch oven on it to preheat, with a few tbsp of olive oil in the bottom.
While the coals and the Dutch oven were getting ready, I prepared the chicken. I mixed the flour and spices in a bowl first of all. I was working with boneless, skinless chicken breasts, so I sliced them into 1” strips and dredged them into the flour mix. I set them aside on a plate.
When the Dutch oven and the oil was hot, I put in the chicken to fry. I covered the bottom and still had only placed about half the chicken, so I did it in batches. I cooked the chicken about ten minutes or so and then turned each piece over using tongs. While the first batch was cooking I chopped up the onion and minced the garlic. When both sides were nice and crispy, and I could see that the insides were cooked through, I pulled them off, and put in the second batch. Somewhere in here, I also added in some fresh coals to the fire to get hot and ready.
While the second batch was cooking, I put my 8” on the coals and melted the butter. The onions and garlic went in with a little salt to sweat. Once those were translucent, the remaining ingredients went in to simmer and melt.
When the second batch of chicken strips were done, I pulled it off the coals and added in the first batch, with the lid on, to keep warm with the residual cast iron heat.
When the sauce was looking nice and smooth, I tasted it and adjusted it. I found my mix to be a little chocolate-heavy so I added in more mustard and vinegar. You can adjust it how you like. In the ingredients list above, I backed off on the cocoa a bit to compensate. I poured about half of the sauce over the chicken in the Dutch open and stirred it up to coat it over all of the pieces.
 Then, I set up the dry-bake. I put the 12” Dutch oven on about 10-12 coals, and put a LOT of good, fresh coals on the lid. Then I lifted the lid and put an old circular grill on the Dutch oven as a spacer for the lid. You can see it in the picture. I put the lid back on. Now, there’s a thin space where moisture can escape. In the past I’ve done that by hooking bent nails over the rim of the Dutch oven. This time, I had this grill that worked very nice. When you do that, however, you need to put a LOT more coals on top, as shown in the instructions, because the lid doesn’t trap the heat and moisture. In this case, the chicken is already cooked, it’s just a matter of dry-baking the sauce on like a glaze. I let it bake for about another fifteen minutes, stirring it once.
Finally, it was ready. I served it with a side of steamed veggies, and did the brownies for dessert. A chocolate day!
Mark has discovered a love of Dutch Oven Cooking. Mark also has other sites and blogs, including MarkHansenMusic.com and his MoBoy blog.
Chocolate what?
No. Stinking. Freaking. Way. What are you thinking? Chocolate chi-- What?

I did some research, and I found a great brownie recipe (which will follow another day), but I wondered what to do for the main dish. I thought about a mole of some kind, and I started looking for recipes. I found, instead, a recipe for a chocolate-based barbecue sauce. Immediately, I thought of the cashew chicken I had done in the previous post. I would do a dredged, crispy fried chicken, and then dry-bake on the sauce!
Though many of the processes are the same as that last dish, there are a few differences, so I’ll write it out again.
Dutch Oven Chocolate Chicken
12” Dutch oven
20+ coals below for frying
10 coals below for baking
30+ coals above
8” Dutch oven
12+ coals below
2 lbs boneless & skinless chicken breast tenders
1/4 cup all purpose flour
1 tsp black pepper
1 tsp kosher salt
1 tsp paprika
4 tbsp. unsalted butter
2-3 cloves garlic, minced
1 small yellow onion, minced
1 1.5 oz. chocolate bar, broken into chunks
1 8ox can tomato sauce
1/2 cup sugar
2 tsp molasses
2 tbsp. vinegar
2 tbsp. unsweetened cocoa powder
2 tbsp coffee grounds or powdered coffee substitute, like Pero
2 tbsp Dijon mustard
2 tsp. chili powder
2 tsp. kosher salt
1 tsp. ground black pepper
First of all, make sure that the chicken is fully thawed before you even start.
I started out, as I usually do, by firing up some coals. Once I had a few that were getting a bit white, I spread about 20 or more out on the table and put the 12” Dutch oven on it to preheat, with a few tbsp of olive oil in the bottom.
While the coals and the Dutch oven were getting ready, I prepared the chicken. I mixed the flour and spices in a bowl first of all. I was working with boneless, skinless chicken breasts, so I sliced them into 1” strips and dredged them into the flour mix. I set them aside on a plate.
When the Dutch oven and the oil was hot, I put in the chicken to fry. I covered the bottom and still had only placed about half the chicken, so I did it in batches. I cooked the chicken about ten minutes or so and then turned each piece over using tongs. While the first batch was cooking I chopped up the onion and minced the garlic. When both sides were nice and crispy, and I could see that the insides were cooked through, I pulled them off, and put in the second batch. Somewhere in here, I also added in some fresh coals to the fire to get hot and ready.
While the second batch was cooking, I put my 8” on the coals and melted the butter. The onions and garlic went in with a little salt to sweat. Once those were translucent, the remaining ingredients went in to simmer and melt.
When the second batch of chicken strips were done, I pulled it off the coals and added in the first batch, with the lid on, to keep warm with the residual cast iron heat.
When the sauce was looking nice and smooth, I tasted it and adjusted it. I found my mix to be a little chocolate-heavy so I added in more mustard and vinegar. You can adjust it how you like. In the ingredients list above, I backed off on the cocoa a bit to compensate. I poured about half of the sauce over the chicken in the Dutch open and stirred it up to coat it over all of the pieces.

Finally, it was ready. I served it with a side of steamed veggies, and did the brownies for dessert. A chocolate day!
Mark has discovered a love of Dutch Oven Cooking. Mark also has other sites and blogs, including MarkHansenMusic.com and his MoBoy blog.
Monday, June 3, 2013
Dutch Oven Cashew Sesame Chicken
Lately, I’ve been doing these chicken dishes where you dredge some chicken breast strips in flour and spices, and then fry them. Then you make some kind of sauce, and bake the sauce on like a glaze.
 I think I’ll make it a series, here. I didn’t really intend to do it, but it kinda worked out that way. This one is a sort of asian-inspired one, with cashews, ginger, soy sauce, and sesame, and the next weekend was the chocolate barbecue sauce. I think the next one I’m going to do will be a buffalo sauce.
Ah luvs me mah hotwings!
Dutch Oven Cashew Sesame Chicken
12” Dutch oven
20+ coals below for frying
10 coals below for baking
22 coals above
8” Dutch oven
12+ coals below
2 lbs boneless & skinless chicken breast tenders
1/4 cup all purpose flour
1 tsp black pepper
1 tsp kosher salt
3 garlic cloves, minced
4 tbsps rice wine vinegar
2 tbsp brown sugar
1 tbsp canola oil
1 tsp grated fresh ginger
1/2 cup soy sauce
1/4 tsp red pepper flakes
4 tbsps ketchup
1/2 cup cashews
2-3 Tbsp toasted sesame seeds
1 1/2 cups rice
3 cups water
First, you’ll want to make sure that the chicken is all completely thawed. Then, light up a bunch of coals. When they start to get white, put a lot (about 20+) coals under a 12” Dutch oven. Drizzle some olive oil (maybe a couple of tablespoons), and let that heat up.
Meanwhile, mix the flour, salt and pepper in a small bowl. If you’re using chicken tenders, they’re already the right size and shape, pretty much. If you’re using breasts, cut them into strips about an inch wide. I Dredged the chicken pieces in the flour mixture and put them into the heated, oiled dutch oven. I kind of snuggled the pieces in pretty close together. I Let them fry for ten minutes or so on each side, until the chicken was cooked in the middle, and had a nice, crusty brown on each surface.
I had to do all the chicken in two batches, because I couldn't get them all in one Dutch oven.
While the second batch was frying, I came inside and mixed all of the other ingredients into a bowl. You can adjust the amounts of everything by taste.
When the second batch of chicken was done, I added the first batch back in, and stirred in the sauce, making sure to coat all of the pieces well. I put it on, and under, the coals to bake a little longer. I added the cashews and the sesame seeds and stirred those in. At this point, everything is cooked, but you just want it to be heated, and to have the flavors baked together.
While this was baking, I put the rice and water into the 8” and put that on some coals, with the lid on. When I noticed steam venting, I let it cook for a bit longer, then pulled it off the coals, and let it sit for another 10 to 15 minutes to finish steaming.
When it was all done, we served the chicken on the rice, and it was delicious!
Mark has discovered a love of Dutch Oven Cooking. Mark also has other sites and blogs, including MarkHansenMusic.com and his MoBoy blog.
Wednesday, May 1, 2013
Dutch Oven Dandelion Delicacies part 2

It might be interesting to know that the name “Dandelion” actually comes from an aglicization of the french “dent-de-lion”, meaning "lion's tooth".
Or not...
In my last blog entry, I talked about making the greens. Here, I’ll instruct on another fascinating dish, the Dandelion Flower Fritters. I made them alongside the greens, and served them together. They don’t have to be done together, obviously. And, in a blog, it’s easier to break them into two separate recipes, separate entries.
I’ll refer you back to that entry to learn about how to harvest the dandelions.
Dandelion Fritters
10” Dutch oven
14-16 coals below
4 tablespoons veggie oil
1 cup milk
2 Tbsp sugar
1 egg
1 cup flour + extra to get the right consistency
20-30 dandelion flower heads
Pancake Syrup or powdered sugar
So, to do the fritters, I put the oil in the 10” Dutch oven, and put it on the hot coals. While that was heating up, I mixed the batter. I just put all of that set of ingredients in a bowl and whisked it up. I mixed it to be a little thicker than my typical pancake batter, which is usually pretty runny.
Once the batter was mixed and the Dutch oven and oil hot, I was ready. I picked up a flower by the green bud underneath, turned it over, and dunked it into the batter. Then I dropped it, sizzling, onto the oven bottom. There was a lot of room, so I just did a lot of them. I just let them cook until the batter was done, then pulled them off, replacing them with more battered buds. It’s really pretty simple.
When it was all done, I plated them alongside the greens, and drizzled them with some pancake syrup. Another suggestion that I’d read about was to sprinkle them with powdered sugar, or even to dip them into ketchup or mustard.
The gentle sweet of the batter, and the syrup helped temper some of that bitter tang that came from the bud. The petals had a real lightness to them. It was a very unique taste overall. If it’s an acquired taste, I acquired it pretty quickly!
Mark has discovered a love of Dutch Oven Cooking. Mark also has other sites and blogs, including MarkHansenMusic.com and his MoBoy blog.
Tuesday, April 30, 2013
Dutch Oven Dandelion Delicacies, part 1

Unfortunately, at the time, It was kinda difficult to find the cute yellow flowers in bloom. Most in my neighborhood were well into seed at that point.
So, today, I was driving home and I happened to notice that the dandelion flowers were really budding out in force. It was also a bright, warm, sunny day (and we’ve had precious few of those lately), so I decided to jump on the opportunity and take a chance.
Of course, I had never cooked them before, nor had I ever eaten them. So, it was kind of a wild shot that it would even work, that it would even taste good. I tried two different dishes, one with the greens and one with the flower. They were not only edible, but even palatable. It was an odd taste. It had tones of sweet and savory, depending on the dish, and also an underlying tone of bitter. But the bitter was really just an edge, rather than the whole flavor. Like I said, it was odd. I don’t think it’s for everyone. In the end, I liked it.
I also need to explain. Since this was the first time I’d tried it, there were things in the process that I think I did wrong. Well, not so much “wrong”, per se, but “not in the best order”. So, I’m writing this from the point of view of how I would do it next time.
Dandelion Greens
8” Dutch Oven
10-12 coals below
10” Dutch Oven
14-16 coals below
1 12” collander filled to heaping with rinsed and trimmed dandelion greens.
~2 cups water
2 tbsp salt
1 lb bacon
1 med onion
3 cloves garlic
salt
pepper
crushed red pepper
lemon or lime juice

It’s good to get a whopping lot of dandelion plants for this project, because after you trim the leaves from the root structure, and then after those leaves cook down, there really isn’t much there. So, start with lots and you’ll end up with plenty.
Were I doing this again, I would prepare the greens first, and take my sweet time doing it. After lighting up some coals on my porch, I would work at my sink. I would grab a dandelion plant and first snap off any usable flowers, then rinse the remaining plant many times over. I’d separate the leaves from the longer flower stems and tear the leaves off just above where the green leaf starts to grow from the stem. Then, I’d rinse those leaves again and toss them into the collander. I’d repeat this process for all of the plants I’d harvested.
At this point, the coals would probably be ready and I’d put them under the 8” Dutch oven with the water and the salt. I’d let that come to a boil. I’d also put more fresh coals in my side fire to light for the flower fritters.
While that was getting to boil, I’d put more coals underneath my 10” Dutch oven, and put in the bacon, cut into short 1” bits. Then, I’d dice or slice the onion and mince the garlic.
Once the bacon was getting crispy, I’d use a spoon and pull out most of the drippings. I’d toss in the onion and the garlic to saute.
By now, the water would be boiling, so I’d add in the greens, a bit at a time. I’d let that boil again, cooking for about 10-15 minutes more.
While the greens are boiling and the onions and bacon are still sauteing, I’d make the flower fritters (see below). Once the greens are done and tender, I would lift them out with tongs and put them back in the collader over the Dutch oven to drain a bit. Finally, I’d toss them into the 10” Dutch oven and stir it all up, sizzling it for a few minutes more. I would add in the seasonings here, too, with particular emphasis on the lemon or lime juice. That goes a long way in tempering the bitter. I had also thought that balsamic vinegar would taste great instead.
At that point, things really don’t need to “cook” any more. It’s all done, you’re just combining it and merging the flavors. Just serve it up. This really is a veggie side dish. In this case, since I was just trying it out, I served it up on plate by with the flower fritters.
My son had been very skeptical, but even he was impressed in the end.
Mark has discovered a love of Dutch Oven Cooking. Mark also has other sites and blogs, including MarkHansenMusic.com and his MoBoy blog.
Thursday, April 25, 2013
Blueberry Pancake Cake

This recipe is in two parts, the pancakes, and the frosting. The Pancakes I took from my first book, “The Best of the Black Pot”, and I used blueberries instead of apples.
Blueberry Cinnamon Pancakes on the Dutch Oven lid
12” dutch oven lid, inverted on a trivet
20 coals underneath, with more in a side fire
3 cups all-purpose flour
1 ½ Tbsp baking powder
1 teaspoon salt
3 Tbsp white sugar
2 1/2 cups milk, with as much as an additional cup to the side
2 eggs
6 tablespoons butter, melted
1 cup of fresh blueberries, coarsely chopped (set a few whole ones aside)
1-2 tsp cinnamon
1 tsp of nutmeg
First, I made the pancakes. I started by lighting up the coals and getting them hot. Once they were ready, I put the trivet over the coals and the 12” Dutch oven lid upside down on the trivet. I sprayed a little oil on the lid as it preheated.
In a bowl, I sifted and mixed the dry ingredients. I mixed in the wet ingredients and stirred it all up. I chopped up the berries (it wasn’t easy, they kept rolling everywhere), and stirred them in with the spices as well.
I find that pancakes cook better if the batter is pretty runny. I added milk until it got to the consistency that I like. It’s a little runnier than a typical cake batter.

Then, it was time to mix up the frosting and assemble the cake.
3 cups confectioners' sugar
1 cup butter or cream cheese
1 teaspoon vanilla extract
1 to 2 tablespoons whipping cream
This is a particularly challenging part of the dish to make if you don’t use any electrical appliances. Because IDOS cookoff rules currently forbid them, I like to try and do all of my blog dishes using hand tools only. In this case, I recommend starting by creaming the butter or the cream cheese using the back of a spoon with holes in it, or a potato masher that has a flat plane with holes. Gradually add in the sugar so as to not make it too stiff right away, then when it starts to look good and aerated, mix in the vanilla and the whipping cream.
Once it’s mixed, then it’s pretty easy to assemble. First, I took out about a third of the frosting. That would be the top. Then, I started with one pancake on my plate, and I spread a paper-thin layer of frosting on it. I allowed a little more thickness at the edges, but not much. I also spread the frosting all the way to the edge. Then, I put another pancake on top of that.
Layer after layer, frosting, pancake, frosting, I built it up. It’s important to not use too much frosting in between layers. Use less than a normal layer cake. First of all, you’ve got six or seven layers and it will get used up pretty fast. Second, eating six or seven full layers of frosting in between the cake will make the whole thing pretty dang sugary!
Sometimes, the frosting would squeeze out a little from between the pancake layers. I didn’t mind that. I thought it looked more “cake-ish” that way.

When serving, I cut it into wedges, just like a regular cake. The blueberries on top and the blueberries in the pancakes make for a delicious cake!
Mark has discovered a love of Dutch Oven Cooking. Mark also has other sites and blogs, including MarkHansenMusic.com and his MoBoy blog.
Sunday, April 7, 2013
Dutch Oven Roasted Cornish Hens on Broccoli Rice

But they had the interview after a meal of roasted dove, which they were eating, as was tradition, with their fingers.
I just latched onto that idea, and it sounded delicious, and like so much fun. I wanted to do something like it. I pondered it for days. I came up with lots of idea of different ways to approach it, and to make it a full meal, not just a meat dish.
One problem to overcome was the meat. What kind of bird to use? I didn’t know where I could get dove. Quail? That was a possibility. One of the guys in the World Championship did a great job cooking quail. Then, one day shopping, I found some cornish hens, frozen. Perfect! Easy to work with, inexpensive, tasty... And, I think, visually impressive!
This ended up being a very simple dish to prepare. Also, for the record, I was not trying to duplicate any particular middle-eastern cuisine, or any actual traditional dish. So, there is no effort whatsoever to make this “authentic”. I just made it all up. So there.
Dutch Oven Roasted Cornish Hens
12” Deep Dutch oven
10 coals below
12-14 coals above
1 cornish hen for each serving (I did 6, and had one extra)
1 1/2-2 cups salt
1/2 cup molasses
about a gallon of water
3 medium onions
salt
pepper
paprika
chili powder
Two days before the meal, I set the little birds (encased in plastic) into the fridge to thaw. Since they’re so small, this could probably work in one day, maybe even in the brining process. But I did it over a couple of days.
The morning of the meal, I got down one of my medium stock pots and put in about a quart or so of hot tap water. I put in the salt and the molasses. The hot water helped those to dissolve. Then, I added about another quart or so of cold water. I opened up the hen packages and drained them briefly, then poked holes in the skin with a knife. A fork works, too. I put them in the brined water. I topped off the water just enough to cover the hens, then added some ice on top. The ice and the salt should keep the germs at bay while the meat gets all savory and tender. I set that aside until cooking time, later that afternoon.
When that time came, I dumped the brine and set the chickens on cooling racks in the sink to drain pretty well. The meat itself will retain a lot of moisture anyway, and I want to minimize the broth at the bottom of the pot.
While the hens were draining, I cut the onions into chunks. I cut them in half first, then quartered the halves. I scattered these into the bottom of the 12” deep Dutch oven, to hold the hens up above the level of the broth that would cook out.
Then I patted the hens dry with paper towels and coated them on both sides with liberal shakes of salt, pepper, paprika, and gentle shakes of chili powder. I tucked them into to Dutch oven all cozy and got them on the coals.
It’s a longer, lower-temperature roast. I’m guessing the interior oven temperature is probably around 275 or 300 with those coals numbered above. The cook time was about an hour and a half to two hours. I went for an internal meat temperature of 180° as a target.
Broccoli Rice
8” Dutch oven
10-12 coals below
1 1/2 cups rice
3 cups water
Juice of 1 lemon
salt
pepper
1 large broccoli head
Broth and onions from the cornish hens
When the roasting was almost done, I made the rice. It’s pretty simple, too. I just put the rice, water, and lemon juice in the 8” Dutch oven, and put it on the coals, with the lid on. While that was coming up to a boil, I cut the broccoli head into tiny florets. I noted when the steam started venting out from under the lid. After ten minutes or so, tossed in the broccoli to steam. I was really quick with the lid, because I didn’t want to lose much heat or steam. Maybe five minutes later, I pulled the oven off the coals, with the lid still on, to finish cooking.
Tortillas
12” Dutch oven lid
18-20 coals below
Flour tortillas (prepackaged or make your own)
My original idea was to make some tortillas from scratch, and then when we eat, we would pull the meat off with our fingers, put it in a torn tortilla piece along with the rice and eat it all with our fingers. In the end, I was kinda tired and so I got lazy and just used some store-bought tortillas. But even those have to be prepared.
So, I turned a 12” Dutch oven lid over onto a lid stand over a whole lotta coals (see above), and let it get really hot. Then I just tossed the tortilla on it and let it heat up and singe a bit. As each one was done, I put it on a plate covered with a tea towel. Hot tortillas are more flexible and tastier.
When it was all done, it was time for serving. I pulled the hens out of the dutch oven, and spooned onions and broth into the rice, stirring it all up. I put a big spoonful of rice mix on the plate, topped it with the hen, and set out the now-warm tortillas. We ate them just as I had planned, by tearing apart the meat and eating it with the rice in the tortillas. I also set out sour cream, and salsa, but we didn’t really add them. It didn’t need it much.
It was a lot of fun, both to cook and to eat!
Mark has discovered a love of Dutch Oven Cooking. Mark also has other sites and blogs, including MarkHansenMusic.com and his MoBoy blog.
Sunday, March 17, 2013
Dutch Oven Stuffed Artichoke on Rice
About a month ago, I was surfing the ‘net, looking for cool Dutch oven sites and I revisited cooking-outdoors.com. I found this recipe: http://www.cooking-outdoors.com/dutch-oven-stuffed-artichokes-recipe.html for stuffed artichokes.
 Instantly, my thoughts and memories went back to my childhood, when my mother steamed some artichoke heads and served them for dinner. We were quite used to strange and new things appearing on our plates, and most of it was good so we tried it. Dad showed us how to pull out the leaves, dip them in the butter sauce, and scrape the tasty, pasty meat off the leaf with our teeth.
I can still remember that as one of our many fun dinners. It was so different, it became not just a good meal, that was good for us, it became an event the family would remember for many years to come. At least, I would!
And as soon as I saw this and watched his video, I knew I had to try it.
...And, of course, I can’t just follow the recipe. I have to try things a little differently! Some of the things I did today were improvised on the moment. I’ll try to recreate them as a recipe, but remember that the amounts are only guesses at best. When you cook them, I encourage you to improvise as well. After all, cooking is like a good jazz tune, right?
Dutch Oven Stuffed Artichoke on Rice
12” Dutch oven
Many, many (24+) coals below
8” Dutch oven
Many, many (12+) coals below
olive oil
1 medium onion, diced fine
3 celery stalks, diced fine
4-5 cloves garlic, minced
1/2-1 lb mild italian sausage
salt
pepper
liberal shakes of dried parsley
dried oregano
dried basil
1-1 1/2 cups fine, dried bread crumbs
About 4 cups water
4 fresh artichoke heads
1/2 cup mayonnaise
1/4 cup commercially prepared salsa
Salt
Pepper
Paprika
Garlic Powder
Chili Powder (add gradually, go light at first)
Lemon juice
2 cups chicken broth
1 cup water
3 cups rice
Remainder of the Stuffing
The first thing I did was to get my 12” regular Dutch oven heating on a lot of coals, with about a tablespoon or two of olive oil in it. It was a very breezy March day, so I knew I was going to go through a lot of coals, and I would have to watch it close and manage the heat very carefully.
Once the oil was shimmery, I dropped in the aromatic veggies. They simmered right away, and I cooked them until they started coloring brown a bit. Then I put in the sausage. When browning the sausage, I took great pains to work the meat so that it ended up cooking in very fine, small chunks. Big globs would be difficult to stuff into the leaves. At this point, I also added in the herbs and seasonings.
It will look like you’re making too much filling to put in the artichokes. That’s OK. Not only do they hold more that you think, but you’ll use the remainder later.
When the sausage was done, I pulled it out with a big serving spoon, working to get out as much as I could. Then I poured in the water. I refreshed the coals, and put the lid on, setting it to boil while I worked on the artichokes.
The first task was to finish the stuffing. I stirred in the bread crumbs. If you use, by the way, pre-seasoned italian bread crumbs, I wouldn’t worry about adding in all the herbs. I stirred it all up, and it mixed pretty nicely. The crumbs absorbed the sausage grease very well. If it still looks too dry and unmanageable to you, you can add a bit of olive oil. I didn’t. It clumped, but was also a bit loose.
I pretty much followed Gary’s instructions in preparing the artichokes, except that I cut my stems shorter. I was using a shallower Dutch oven than he did, so I cut mine off at only about a half inch to 3/4 inch long. Here’s the process:
Then, I stuffed the artichokes. I held them over a plate to catch all the leftover stuffing. I held it upright in front of me with one hand, and used that thumb to pry apart the leaves. I poured stuffing into the spaces with a spoon. I was surprised how much I could get into one head. Even still, there was about a third left over.
Back out to the Dutch Oven, where the water was boiling by now. I put each artichoke head into the Dutch oven, stem down, side by side. All four fit pretty snugly. I put on the lid and marked the time. From that time on, it was only a matter of maintaining the coals on the bottom and checking at 20-30 minute intervals if the water was still there. I let these cook for about an hour and 15 minutes.
While they were cooking, I first made the sauce, and then made the rice.
Like I said, the quantities of the ingredients of the sauce were pretty much improvised. I put in the mayo, then the salsa. I whisked those together and tasted to make sure there was a balance. Then, I added the other ingredients and seasonings by shake. At each point, I tasted, until I felt there was a good balance. I did add the chili powder, but I didn’t want this to be a hot dish. I just wanted some ZING.
When there was only 20 minutes or so left in the cooking, I put on the rice, water, and stock. I noted when it started boiling by when it vented out from under the lid. From there I let it cook on the coals for about another ten minutes. Then I took it off the coals and let it sit, covered, for another ten minutes. Finally, I fluffed it with my fork, and mixed in the remnant of the filling. That was another thing that was improvised.
I served it up with a bed of rice, and the flowery head of the artichoke on top. Off to the side was a small ramekin with the dipping sauce. I also had made some small loaves of sourdough today, so I included that in the picture.
 If you’ve never eaten whole artichoke before, it really is a lot of fun. It’s finger food. You grab one of the leaves by the tip, and pull it off the head. It kinda acts as a spoon and catches the stuffing that was in that pocket. You dip the foot end into your sauce, then put it in your mouth. You scrape the leaf against your upper teeth, scraping all of that soft stuffing and artichokey goodness off the leaf husk. Then you set the leaf on your plate, and grab another.
It was a really delicious meal. One of my sons fought us on the leaves, but he loved the rice. The other loved the whole thing. It was a family evening together that I’ll treasure for a long time!
Mark has discovered a love of Dutch Oven Cooking. Mark also has other sites and blogs, including MarkHansenMusic.com and his MoBoy blog.

I can still remember that as one of our many fun dinners. It was so different, it became not just a good meal, that was good for us, it became an event the family would remember for many years to come. At least, I would!
And as soon as I saw this and watched his video, I knew I had to try it.
...And, of course, I can’t just follow the recipe. I have to try things a little differently! Some of the things I did today were improvised on the moment. I’ll try to recreate them as a recipe, but remember that the amounts are only guesses at best. When you cook them, I encourage you to improvise as well. After all, cooking is like a good jazz tune, right?
Dutch Oven Stuffed Artichoke on Rice
12” Dutch oven
Many, many (24+) coals below
8” Dutch oven
Many, many (12+) coals below
olive oil
1 medium onion, diced fine
3 celery stalks, diced fine
4-5 cloves garlic, minced
1/2-1 lb mild italian sausage
salt
pepper
liberal shakes of dried parsley
dried oregano
dried basil
1-1 1/2 cups fine, dried bread crumbs
About 4 cups water
4 fresh artichoke heads
1/2 cup mayonnaise
1/4 cup commercially prepared salsa
Salt
Pepper
Paprika
Garlic Powder
Chili Powder (add gradually, go light at first)
Lemon juice
2 cups chicken broth
1 cup water
3 cups rice
Remainder of the Stuffing
The first thing I did was to get my 12” regular Dutch oven heating on a lot of coals, with about a tablespoon or two of olive oil in it. It was a very breezy March day, so I knew I was going to go through a lot of coals, and I would have to watch it close and manage the heat very carefully.
Once the oil was shimmery, I dropped in the aromatic veggies. They simmered right away, and I cooked them until they started coloring brown a bit. Then I put in the sausage. When browning the sausage, I took great pains to work the meat so that it ended up cooking in very fine, small chunks. Big globs would be difficult to stuff into the leaves. At this point, I also added in the herbs and seasonings.
It will look like you’re making too much filling to put in the artichokes. That’s OK. Not only do they hold more that you think, but you’ll use the remainder later.
When the sausage was done, I pulled it out with a big serving spoon, working to get out as much as I could. Then I poured in the water. I refreshed the coals, and put the lid on, setting it to boil while I worked on the artichokes.
The first task was to finish the stuffing. I stirred in the bread crumbs. If you use, by the way, pre-seasoned italian bread crumbs, I wouldn’t worry about adding in all the herbs. I stirred it all up, and it mixed pretty nicely. The crumbs absorbed the sausage grease very well. If it still looks too dry and unmanageable to you, you can add a bit of olive oil. I didn’t. It clumped, but was also a bit loose.
I pretty much followed Gary’s instructions in preparing the artichokes, except that I cut my stems shorter. I was using a shallower Dutch oven than he did, so I cut mine off at only about a half inch to 3/4 inch long. Here’s the process:
- Using my kitchen shears, I snipped off a row of the bottom-most leaves, and any leaf that was out on the stem.
- Then, I trimmed off about 1/4 inch off of every leaf in the head, just going around the perimeter. This looked nice, as Gary said, but it also made a big difference in the stuffing.
- Once I got to the central part, I used my chef’s knife to lop off the top half to 3/4 inch of the center. Then I used my thumb to pry the whole thing open, and to loosen and stretch the leaves.
- Finally, I cut off the stems.
Then, I stuffed the artichokes. I held them over a plate to catch all the leftover stuffing. I held it upright in front of me with one hand, and used that thumb to pry apart the leaves. I poured stuffing into the spaces with a spoon. I was surprised how much I could get into one head. Even still, there was about a third left over.
Back out to the Dutch Oven, where the water was boiling by now. I put each artichoke head into the Dutch oven, stem down, side by side. All four fit pretty snugly. I put on the lid and marked the time. From that time on, it was only a matter of maintaining the coals on the bottom and checking at 20-30 minute intervals if the water was still there. I let these cook for about an hour and 15 minutes.
While they were cooking, I first made the sauce, and then made the rice.
Like I said, the quantities of the ingredients of the sauce were pretty much improvised. I put in the mayo, then the salsa. I whisked those together and tasted to make sure there was a balance. Then, I added the other ingredients and seasonings by shake. At each point, I tasted, until I felt there was a good balance. I did add the chili powder, but I didn’t want this to be a hot dish. I just wanted some ZING.
When there was only 20 minutes or so left in the cooking, I put on the rice, water, and stock. I noted when it started boiling by when it vented out from under the lid. From there I let it cook on the coals for about another ten minutes. Then I took it off the coals and let it sit, covered, for another ten minutes. Finally, I fluffed it with my fork, and mixed in the remnant of the filling. That was another thing that was improvised.
I served it up with a bed of rice, and the flowery head of the artichoke on top. Off to the side was a small ramekin with the dipping sauce. I also had made some small loaves of sourdough today, so I included that in the picture.

It was a really delicious meal. One of my sons fought us on the leaves, but he loved the rice. The other loved the whole thing. It was a family evening together that I’ll treasure for a long time!
Mark has discovered a love of Dutch Oven Cooking. Mark also has other sites and blogs, including MarkHansenMusic.com and his MoBoy blog.
Subscribe to:
Posts (Atom)